Updated: January 16th, 2021
Execution Time: 15-30 minutes
Goal: To track your Pinterest Ads conversions from inside the platform.
Ideal Outcome: You are able to see how many conversions your Pinterest Ads campaigns brought you, and how much they are worth to you.
Prerequisites or requirements: Google Tag Manager needs to already be running on your website, if you haven’t already you can follow other SOPs available for WordPress, Shopify, and Squarespace. You will also need a Pinterest Ads account.
Why this is important: Seeing how many conversions and how much revenue each ad is bringing you, allows you to start optimizing your campaigns for the best results.
Where this is done: In Google Tag Manager and Pinterest Ads Manager.
When this is done: Every time there is a new conversion or website that needs to be tracked inside Pinterest Ads Manager.
Who does this: The person responsible for, analytics, or paid advertising.
⃞ Environment setup #
- 1. Install the Pinterest Tag Helper extension for Google Chrome on your browser.
⃞ Install the base code #
- 1. Log in to your Pinterest Ads account here.
- 2. Click Ads → Conversions → Install the Tag
- 3. Select ‘Add code using a Partner Integration’:
- 4. Select Google Tag Manager then click “Continue”:
⚠️ Note: If you use any of the other Partner Tools available in this menu you might want to go for those instead of following this SOP.This SOP will take you through the process of installing it using Google Tag Manager, which will work for 99% of the websites. But if you run an ecommerce site with Shopify, it’s recommended to go with the native implementation instead,
this will give you a deeper level of integration with your platform. - 5. Select the Google Account which has access to the Google Tag Manager account that you will want to use to setup pinterest:
- 6. Allow Pinterest to get access to your Google Tag Manager account:

- 7. Select the Google Tag Manager account and Container where you want to setup your Pinterest tags.ℹ️ This is the Google Tag Manager container that is currently running on your website.
- 8. Name your tag in a way that fits your Google Tag Manager naming convention → Click “Install Tag”.
- 9 Your base code is installed and Pinterest should now be tracking Pageviews to your site:
⚠️ Note: This method will add your Pinterest Base code to All Pages where the Google Tag Manager container is running on your website. This is a good option for 99% of the websites out there, but if for some reason this is not the case for you, you can always go inside your Google Tag Manager account and set up your trigger in a different way:
⃞ Determine the conversion events you want to track #
- 1. Pick the events you would like to track based on the purpose on the table below and whether you would use them to improve your Pinterest campaigns:
Table Source: Pinterest💡Tip: Most businesses only need to track Leads, AddToCarts and/or Checkouts.
⃞ Setting up your conversion trigger in Google Tag Manager #
- 1. Go to tagmanager.google.com and select the account you want to work on:

- 2. You will now need to define what kind of action do you want to track, this SOP covers 2 of the most popular tracking needs:
- a. Page View: If your conversion is followed by a “Thank You” page, or If your conversion is a view of an important page (e.g: pricing page) you can select this one.
- b. Button/Link Click: If your conversion is a click on a button or link (e.g: “Add to Cart” buttons, clicks to external affiliate pages, “Buy now” buttons when there is no “Thank
You” page, among others) you can select this one.
■ Tracking a Page View #
- 1. Go to “Triggers” → “New”

- 2. Rename your Trigger → Click “Choose a trigger to begin set-up…” → Select “Page View” → Select “Some Page Views”:
-
- a. Note: When naming your trigger it is recommended that you define your naming convention. It should be clear and fast to guess what each trigger is doing based solely on its name. For this SOP we will be using:
“Conversion_ThankYou_FreeClasses” since this trigger is going to be used to track a conversion, using a thank you page, related to the “free SEO class offer”.
-
- 3. Under the trigger firing rules, select: “Page URL” → “matches RegEx”.
- 4. You will now need to build a RegEx (Regular Expression) that matches the URL where we want our Pinterest Ads Conversion to fire.
- a. Note: If you are comfortable with GTM and your website structure you might not need to use a RegEx condition at this point, or you might want to tweak the RegEx to fit your needs. If not, you can follow this procedure.
- b. Note2: In the following steps you’ll be creating a RegEx that will match your url whether:
-
- 1. It starts with http, or https;
- 2. You are using a trailing slash, or not;
- 3. You are adding parameters to your URL, or not;
- 4. You have deeper URLs in your folder structure, or not;
- i. Type the url where you want your conversion to fire.E.g: http://www.asiteaboutemojis.com/thank-you/
- ii. Remove the http:// (or https://), the www, and the last trailing slash from the URL:E.g: asiteaboutemojis.com/thank-you
- iii. Add a \ right before every dot and every slash.E.g: asiteaboutemojis\.com\/thank-you
- iv. Add this code after your URL: (?!\/.*\/)((\/?)$|.*.*=.*)E.g:asiteaboutemojis\.com\/thank-you(?!\/.*\/)((\/?)$|.*.*=.*)
- v. Add this code in the beginning of your URL: (http|https):\/\/(www\.)?E.g: (http|https):\/\/(www\.)?asiteaboutemojis\.com\/thank-you(?!\/.*\/)((\/?)$|.*.*=.*)
- vi. That’s it. You just built your RegEx. Take note of that expression.
-
- 5. Insert your RegEx in the last field. It should look something like this:

- 6. Click the blue “Save” button to save your trigger:

- 7. The next steps correspond to setting up a “Click” event. Click here to continue to the next step of the “Page View” SOP.
■ Setting up a “Click” Event #
- 1. Click “Variables” → “Configure”.
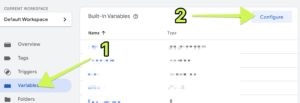
- 2. A list of variables will be available to you. Select all the variables under “Clicks” and when that is done close the list.
- a. Note: If you already know which variables you are going to need. You can simply select the specific variable you are going to be using for this event.
- a. Note: If you already know which variables you are going to need. You can simply select the specific variable you are going to be using for this event.
- 3. Click “Triggers” → “New”:
- 4. Rename your Trigger → Click “Choose a trigger to begin set-up…” → Select “Click: All Elements” → Select “All Clicks” → “Save”:
- a. Note: When naming your trigger, it is recommended that you define your naming convention. It should be clear and fast to guess what each trigger is doing based solely on its name. For this SOP we will be using:“Engagement_AddtoCart” since this trigger is going to be used to track an AddtoCart click and we only have one button on this store.
- a. Note: When naming your trigger, it is recommended that you define your naming convention. It should be clear and fast to guess what each trigger is doing based solely on its name. For this SOP we will be using:“Engagement_AddtoCart” since this trigger is going to be used to track an AddtoCart click and we only have one button on this store.
- 5. You now need to find out which of the variables to use for the purpose of what you want to track. To do that click “Preview” on the top right of the page:

- 6. Enter the URL of your website → Click “Start”
- 7. This will open your website’s URL on a new tab. Navigate to the page where the button you want to track is. You should be able to see a message on the bottom right corner letting you know that the debugger has connected successfully:
- 8. On your keyboard hold down the “Ctrl” (or “Cmd ⌘” key If you’re using a Mac) and click on the button that you want to track. A new “Link Click” (or gtm.click) option should appear on the Google Tag Manager list to the left → Click that option → Click “Variables
- 9. In this list, Google Tag Manager lists all the information that was returned from that click.
- a. If your “Click ID” field has been filled with a text string (e.g: ‘atc_emoji_main’) take note of the combination. (e.g: Click ID | atc_emoji_main)
- i. Note: Usually HTML ID’s are unique within the page, in rare cases your web designer might have used the same ID for different elements. If that is the case you will want to select option b. or c.
- b. If you don’t have a “Click ID” and you are sure your HTML Class is not shared with any other button that you don’t want to track, you can use that. Take note of that combination (e.g: Click Classes | add-to-cart). If you are unsure, go
with the next option (). - c. If none of those two options apply to you, you should use the “Click Text” variable. Take note of that combination (e.g: Click Text | Add to cart)
- i. Note: Make sure this specific text is not being used elsewhere in another link. Otherwise clicks on that link will count as conversions as well.
- i. Note: Make sure this specific text is not being used elsewhere in another link. Otherwise clicks on that link will count as conversions as well.
- a. If your “Click ID” field has been filled with a text string (e.g: ‘atc_emoji_main’) take note of the combination. (e.g: Click ID | atc_emoji_main)
- 10. Click “Triggers” and then select the trigger you just created in “step 4” of this SOP:
- 11. Click “Trigger Configuration”→ Under “This trigger fires on” select “Some Clicks” → Select the combination you took note in “step 9” of this SOP → Hit “Save”.(e.g: [Click ID][equals][atc_emoji_main])
⃞ Setup your conversion events #
- 1. Login to your Google Tag Manager account and select the GTM container that is running on your website:

- 2. Click “Tags” → “New” → “Tag Configuration” → “Tag Type: Pinterest”
- 3. Setup your tag:
- a. Tag ID: This is your Pinterest Tag ID you can find it in your Pinterest account by clicking “Ads” → “Conversions” → “Tags” and copying the numbers that show up after your Tag Name.
- b. Hashed Email: Leave blank unless you know its purpose and have the technical ability to implement it. This will slightly increase your tracking accuracy.ℹ️ This is an optional field. Not covered by this SOP. If you have a GTM variable with the email address of the user you can use it here. (Ideally hashed with MD5, SHA1, or SHA-256).
- c. Event to Fire: This will be the type of event that you selected in the previous chapter.
- d. Other properties: Depending on the ‘Event to Fire’ that you select you might have the ability to add a few other properties. For example if you select a ‘Checkout’ event you will have the ability to add:
- i. Order Value
- ii. Currency
- iii. Order Quantity
- iv. Order ID
- v. Product ID
- vi. Product Category
While ideally you will want to have as many of them filled out, the reality is that implementing such properties might require the work of a developer.
If the values for those properties are static (for instance, if the only product
you sell is an eBook worth $97) then you can add static values to those properties. But for most businesses that is not the case.You can skip these other properties as they’re mostly optional. The downside is that such additional
information might not be available inside Pinterest Ads Manager.
- a. Tag ID: This is your Pinterest Tag ID you can find it in your Pinterest account by clicking “Ads” → “Conversions” → “Tags” and copying the numbers that show up after your Tag Name.
- 4. Setup your trigger: Scroll down to the “Triggering” section → Click “Choose a trigger to make this trigger fire…” → Select the trigger you have just created in the previous chapter of this SOP → Click “Save”

- 5. On the top right corner click “Submit”
- 6. In the Submission Configuration panel you will be given the chance to add a name and description to this version. After you have done so, hit “Publish”.
- a. Note: Adding a name and description is optional but recommended. You should enter information here that will make it easy to know what changes are being made.

- a. Note: Adding a name and description is optional but recommended. You should enter information here that will make it easy to know what changes are being made.
- 7. That’s it! You will now be taken to see the summary of the changes you’ve just made:
⃞ Verifying that your tag and conversion events are successfully setup #
- 1. Open your website using Google Chrome.
- 2. Perform the required action to trigger your conversion.
- a. e.g: Open your “Thank You” page, Submit your form, Click your add-to-cart button, etc.
- b. Note: To test button clicks it’s better If in your keyboard you hold down the “Ctrl” (or “Cmd ⌘” key If you’re using a Mac) before clicking on the button that you want to track. This will make sure you will remain on the same page and therefore able to see if the event was indeed triggered.
- 3. Click on the Pinterest Tag Helper Chrome extension icon. You should now see a green message indicating no tag issues were found.
In addition you should see under the ‘Events’ section the Event that was supposed to trigger when the action is taken.

- 4. Make sure your conversion is not firing when you don’t want it to by performing an unrelated non-conversion action and checking if the tag has been triggered.
- a. Note: If your conversion is a “Thank You” pageview, head over to another unrelated page, If your conversion is a button click, try clicking some other similar buttons on the page, etc.

- a. Note: If your conversion is a “Thank You” pageview, head over to another unrelated page, If your conversion is a button click, try clicking some other similar buttons on the page, etc.
- 5. Lastly, you’ll want to check your data is being received correctly by Pinterest as well. To do that, on Pinterest Ads Manager head over to Ads → Conversions → Event History and make sure there is some data for your Base Code and Events and that the date matches today’s date.