Last Updated / Reviewed: June 15th, 2021
Execution Time: 15-30 minutes
Goal: To track your Google Ads conversions inside the platform.
Ideal Outcome: You can see how many conversions your Google Ads campaigns brought you and you can monitor your ad spending.
Prerequisites or requirements: To follow this SOP, you will need to have installed Google Tag Manager (GTM) on your site. If you haven’t done so, and you are using WordPress you can follow SOP 004. You will also need an Google Ads account, If you don’t have one yet, you can follow SOP 014.
Why this is important: When you finish this SOP, you should then be able to see how many conversions and how much revenue each ad is bringing you, allowing you to start optimizing your campaigns for the best results.
Where this is done: In Google Tag Manager and Google Ads.
When this is done: Every time there is a new conversion that needs to be measured.
Who does this: The person responsible for website management, analytics, or paid advertising.
________________________________________
● Creating your conversion in the new Google Ads Interface
1. Log into your Google Ads account by going to https://ads.google.com
Note: Make sure your account is already using the new Google Ads interface. If your interface looks different than the one that is shown in this SOP, you might be using the classic interface. If that is the case you should see a button prompting you to try the new interface, you just need to click it.
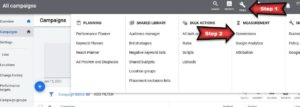
2. Go to Tools (wrench icon) >> Under ‘Measurements’, click ‘Conversions’:
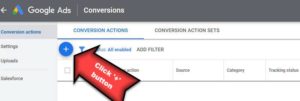
3. You will be diverted to the ‘Conversions’ panel, click the blue “+” button:
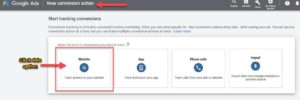
4. You will then be inside the ‘New conversion action’ panel, where you have 4 options under ‘Select the action you want to track’:
a. Website
b. App
c. Phone calls
d. Import
Click the ‘Website’ option.
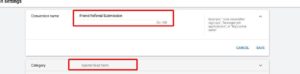
5. Inside the ‘New Conversion Action’ panel, you will need to complete the ‘Create an action’ form to customize the conversion actions you want to monitor:

a. Category: Select the category that best fits your conversion, this will not affect your tracking or the delivery of your ads, instead it will allow you to segment your conversions on your reports so you can analyze similar conversions together. The dropdown option will reveal 3 subcategories:
● Sales subcategories – All your purchase conversions are under this category:
o Purchase
o Add to cart
o Begin checkout
o Subscribe – like paid memberships, monthly service subscriptions, etc.
● Lead subcategories – Any lead conversion tracking including:
o Contact
o Submit lead form
o Sign-up
o Book appointment
o Request quote
o Get directions
o Outbound click.
● More subcategories – Include:
o Page view – Select this category when your conversion is a pageview of a page that is known to be tightly related to one of your key conversions (e.g., viewing the pricing page).
o Other – If your conversion does not fit any of the previous categories, or, if you prefer to have conversions being grouped under this extra category you can do so.
Note: Feel free to choose your subcategory the way you think better suits your business, e.g.:
– If your business requires a “Phone Number” to consider the conversion a lead, then “Friend Referral” could be better for the “Submit lead form” category instead.
– If your sign-up process has multiple steps you can choose to consider an “Initiated Sign Up” conversion to be inside the “Sign Up” category, or a “Page view”.
It’s important that your internal reports follow the same structure as your Google Ads account to make sure all departments are speaking the same language.
b. Conversion name: The name should be short and intuitive; it should be obvious for you or anyone what it is about since this name will appear on your reports.
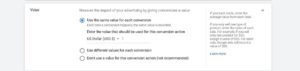
c. Value: This field is optional but recommended. If you can estimate how much this conversion is worth to you, you should enter it here.
Example: If you are not sure how much a conversion is worth to you since it is not a purchase, you can estimate it by:
o If your Lead to Customer conversion rate is 15%, and each customer is worth 100$ to you, this means that every lead is worth about 15$. (Conversion Rate x Purchase Value)
o If you are running a subscription business, or your funnel includes multiple products/services, the “Purchase Value” should be your Average Customer Lifetime Value.
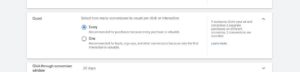
d. Count:
● Every: Select this option if you would like this conversion to be counted every time it happens after an ad interaction. Usually, you will only want to select this option if the conversion adds value to your business even if performed by the same visitor multiple times. (e.g.: a purchase, booking an appointment for different times)
● One: Select this option if you only want this conversion to be fired once per ad click. (e.g.: If you have 2 contact forms with the same objective on your website and some users for some reason submit both)
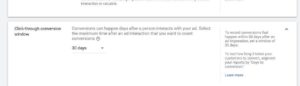
e. Clickthrough conversion window: Here you can configure the period of time after a visitor clicked on your ad during which you can consider a conversion to have been attributed to your Google Ads campaign.
Note: If a conversion happens outside of the conversion window you selected it will not be reported in Google Ads.
In order to best select the conversion window, you should look at your customer behavior and understand how long your buyer’s journey takes.
Examples:
● If you’re running a SaaS platform and promoting a 14-day trial, you might want your conversion window to be bigger than 14 days otherwise some sales might not be recorded in Google Ads.
● If you’re running an abandoned cart remarketing Facebook Ad campaign 10 days after the user has left the website, you might not want these conversions being reported on your Google Ads reports and might want to set the conversion window to 9 days instead.
● You might want to set up similar conversion windows across all your ad platforms (e.g.: Facebook Ads) to make it easier to compare results.
f. View-through conversion window: Works the same way as the ‘Clickthrough conversion window’ field but applies to view-through conversions (conversions that happened after a visitor viewed, but didn’t click, an ad for your website).
Usually, you will want to set this window to a lower value than the one you’ve selected for your ‘Clickthrough conversion window’ or else you might end up with a lot of view-through conversions that are not necessarily attributed to the fact that the visitor viewed your ad.
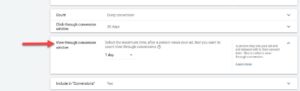
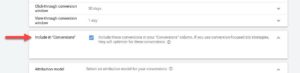
g. Include in “Conversions”:
● Ticking this option will have 2 effects:
o If you’re using Smart Bidding, Google Ads will optimize your campaign for your selected objective based on these conversions.
o Whether you are using Smart Bidding or not, the conversion will be reported under the “Conversions” column in your reports.
Note: Even if left unticked you will still be able to see all conversions in the “All Conversions” column.
● As a general rule, you want to tick this option for your most important conversions, the ones that are mostly the end-goal of your campaigns.
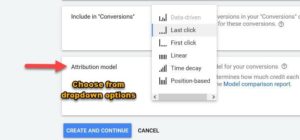
h. Attribution Model:
Depending on your advertising strategy, a user might interact with multiple ads before actually performing the intended action. Use this option to define how much credit you want to attribute to each of these interactions.
In most cases, you will want to select “Last click” as this will ensure that all the credit is given to the last ad the user interacted with. Note that this means that if the user has previously interacted with another ad before that ad will not be reporting any conversion even though in some way it might have aided the conversion.
To give advertisers some more options, Google Ads offers a few more options to distribute this credit throughout the conversion path:
● Data driven
● Last click
● First click
● Linear
● Time decay
● Position-based
If you are unsure, select “Last Click”.
6. Finally, click “Create and Continue”:
7. You will then reach the Tag Setup panel, where you are given 3 choices:
a. Install the tag yourself
b. Email the tag
c. Use Google Tag Manager
For the purpose of this SOP, we will choose Use Google Tag Manager.
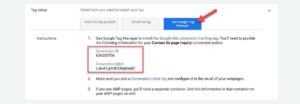
Take note of your ‘Conversion ID’ and ‘Conversion label.’
● Setting up your conversion trigger in Google Tag Manager
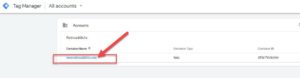
1. Go to tagmanager.google.com and select the account you want to work on:
2. You will now need to define what kind of action do you want to track; this SOP covers 2 of the most popular tracking needs:
a. Page View: If your conversion is followed by a “Thank You” page, or if your conversion is a view of an important page (e.g.: pricing page), you can select this one.
b. Button/Link Click: If your conversion is a click on a button or link (e.g.: “Add to Cart” buttons, clicks to external affiliate pages, “Buy now” buttons when there is no “Thank You” page, among others), you can select this one.
■ Tracking a Page View
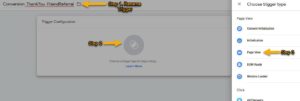
1. Go to Triggers >> New:

2. Rename your Trigger >> Click “Choose a trigger to begin setup >> Select “Page View”:
Note: When naming your trigger, it is recommended that you define your naming convention. It should be clear and fast to guess what each trigger is doing based solely on its name. For this SOP we will be using: “Conversion_ThankYou_FriendReferral” since this trigger is going to be used to track a conversion, using a thank you page for referring a friend to get a $20 coupon.
3. After selecting ‘Page View,’ click on ‘Some Page Views’
4. Under the trigger firing rules, select: ‘Page URL’ >> ‘matches RegEx’.
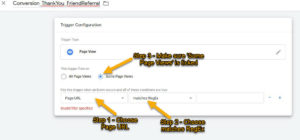
5. You will now need to build a RegEx (Regular Expression) that matches the URL where we want our Google Ads Conversion to fire.
a. Note: If you are comfortable with GTM and your website structure you might not need to use a RegEx condition at this point, or you might want to tweak the RegEx to fit your needs. If not, you can follow this procedure.
b. Note 2: In the following steps you’ll be creating a RegEx that will match your URL whether:
❏ It starts with http, or https;
❏ You are using a trailing slash, or not;
❏ You are adding parameters to your URL, or not;
❏ You have deeper URLs in your folder structure, or not;
i. Type the URL where you want your conversion to fire.
e.g.: http://www.retroaddicts.com/thank-you-new-subscriber/
❏ Remove the http:// (or https://), the www, and the last trailing slash from the URL:
e.g.: retroaddicts.com/thank-you-new-subscriber
❏ Add a \ right before every dot and every slash.
e.g.: retroaddicts\.com\/thank-you-new-subscriber
❏ Add this code after your URL: (?!\/.*\/)((\/?)$|.*.*=.*)
e.g.: retroaddicts\.com\/thank-you-new-subscriber(?!\/.*\/)((\/?)$|.*.*=.*)
❏ Add this code in the beginning of your URL: (http|https):\/\/(www\.)?
e.g.: (http|https):\/\/(www\.)?retroaddicts\.com\/thank-you-new-subscriber(?!\/.*\/)((\/?)$|.*.*=.*)
❏ That’s it. You just built your RegEx. Take note of that expression.
6. Insert your RegEx in the last field. It should look something like this:

6. Click the blue “Save” button to save your trigger:
![]()
7. The next steps correspond to setting up a “Click” event. Click here to continue to the next step of the “Page View” SOP.
■ Setting up a “Click” Event.
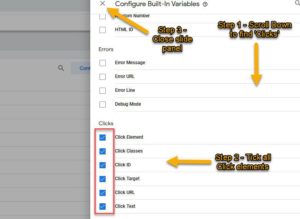
1. Click ‘Variables’ >> ‘Configure.’
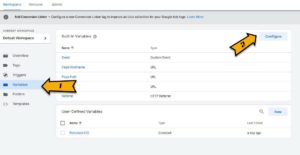
2. A list of variables will be available to you. Select all the variables under “Clicks” and when that is done close the list.
Note: If you already know which variables you are going to need. You can simply select the specific variable you are going to be using for this event.
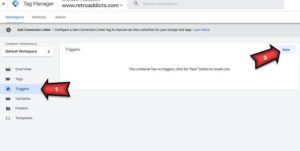
3. Click ‘Triggers’ >> ‘New’:
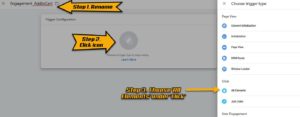
4. Rename your Trigger >> Click “Choose a trigger to begin setup >> Select ‘All Elements’ under Clicks:
Note: When naming your trigger, it is recommended that you define your naming convention. It should be clear and fast to guess what each trigger is doing based solely on its name. For this SOP we will be using: ‘Engagement_AddtoCart‘ since this trigger is going to be used to track an AddtoCart click and we only have one button on this store.
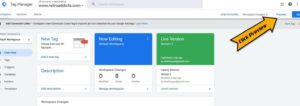
5. Now, you need to find out which of the variables to use for the purpose of what you want to track. To do that open another tab to access the Google Tag Manager workspace panel and click “Preview” on the top right of the page:
6. Enter the URL of your website >> Click ‘Connect:’
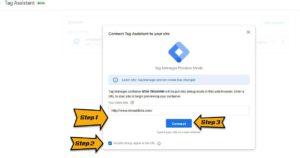
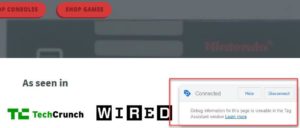
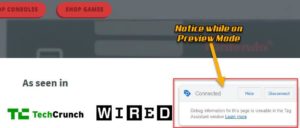
7. This will open your website’s URL on a new tab. Navigate to the page where the button you want to track is. You should be able to see a message on the bottom right corner letting you know that the debugger has connected successfully:
8. On your keyboard, hold down the “Ctrl” (or “Cmd ⌘” key If you’re using a Mac) and click on the button that you want to track.
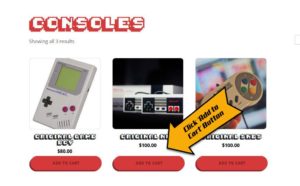
9. Google Tag Assistant (https://tagassistant.google.com/) will list all your actions. In this list, Google Tag Manager lists all the information that was returned from that click.
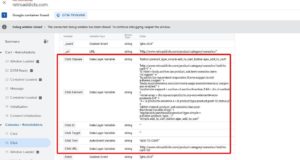
a. If your “Click ID” field has been filled with a text string (e.g: ‘link_text-6-20’) take note of the combination. (e.g: Click ID | link_text-6-20)
i. Note: Usually HTML ID’s are unique within the page, in rare cases your web designer might have used the same ID for different elements. If that is the case you will want to select option b. or c.
b. If you don’t have a “Click ID” and you are sure your HTML Class is not shared with any other button that you don’t want to track, you can use that. Take note of that combination (e.g: Click Classes | add_to_cart_button). If you are unsure, go with the next option (c.).
c. If none of those two options apply to you, you should use the “Click Text” variable. Take note of that combination (e.g: Click Text | ADD TO CART)
i. Note: Make sure this specific text is not being used elsewhere in another link. Otherwise clicks on that link will count as conversions as well.

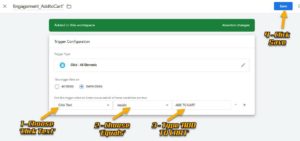
10. Go back to Google Tag Manager, and edit the trigger you previously created (in our example, the ‘Engagement_AddtoCart’ trigger).
11. Click “Trigger Configuration” >> Under “This trigger fires on” select ‘Some Clicks’ >> Select the combination you took note in Step #8 of this SOP, then Hit “Save”.
(e.g.: Click text | equals | ADD TO CART)
● Setting up your conversion tag in Google Tag Manager
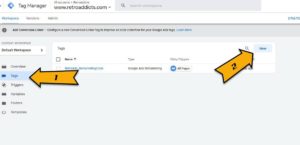
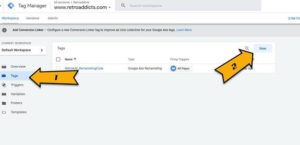
1. In the sidebar click on ‘Tags’, and then ‘New’:
2. Rename your tag:
Note: When creating new tags it’s recommended to define a naming convention from the beginning, this keeps your Google Tag Manager set up neatly organized and easy to maintain for many years to come.
[Abbreviated Name Of Tool]_[Use for this tag] is a good start (e.g: “GAds_Conversion_FriendRef)
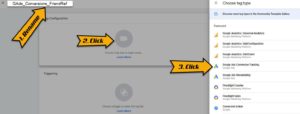
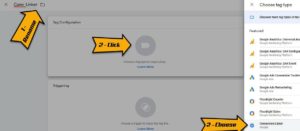
4. Under ‘Tag Configuration,’ click the tag icon above ‘Choose a tag type to begin setup’. From the dropdown list select “Google Ads Conversion Tracking”.
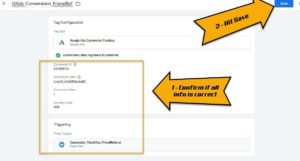
5. Enter your conversion details:
a. Conversion ID: Insert the Conversion ID that you got in step 7 of the first chapter of this SOP.
b. Conversion Label: Insert the Conversion Label that you got in step 7 of the first chapter of this SOP.
c. Conversion Value: If you have chosen to have a conversion value you should add it here. Do not include the currency symbol.
d. Order ID: Leave empty unless you are able to dynamically parse an Order ID value (out of the scope of this SOP).
e. Currency Code: Only use this field if you have entered a conversion value. Enter the 3-letter currency code (ISO 4217) you want to use for this conversion.
i. Note: You can find a list of 3-letter currency codes here.
6. Scroll down to the ‘Triggering’ section >> Click ‘Choose a trigger to make this trigger fire’ >> Select the trigger you have just created in the previous chapter of this SOP >> Click “Save.”
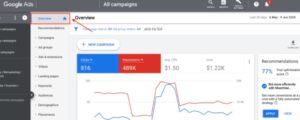
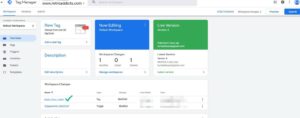
7. If you click on “Overview” on the sidebar, Google Tag Manager will display an overview of the changes you’ve made:
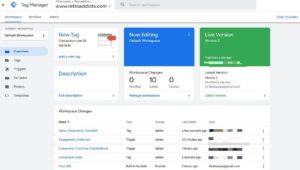
8. If everything looks ok, you are now ready to hit “Submit”
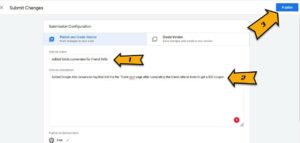
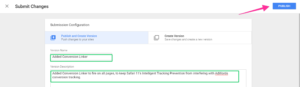
9. In the Submission Configuration panel, you will be given the chance to add a name and description to this version. After you have done so, hit “Publish”.
Note: Adding a name and description is optional but recommended. You should enter information here that will make it easy to know what changes are being made.
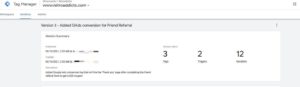
10. That’s it! You will now be taken to see the summary of the changes you have just made:
● Adding the Conversion Linker tag to your Google Tag Manager Setup
Note: You only need to do this if you are not using the “Conversion Linker” tag yet. This only needs to be done once.
1. In the sidebar click on “Tags”, and then “New”:
2. Rename your tag:
a. Note: When creating new tags it’s recommended to define a naming convention from the beginning, this keeps your Google Tag Manager set up neatly organized and easy to maintain for many years to come.
[Abbreviated Name Of Tool]_[Use for this tag] is a good start (e.g.: “GAds_ConvLinker”.)
3. Under “Tag Configuration” click icon above ‘Choose a tag type to begin set-up’ → Select ‘Conversion Linker’
4. Under ‘Triggering’ click icon above ‘Choose a trigger type to make this tag fire’ >> Select ‘All Pages’ >> click ‘Save.’
5. If you now click on “Overview” on the sidebar, this is how your Google Tag Manager overview dashboard should look like:
6. If everything looks ok, you are now ready to hit “Submit.”
7. In the Submission Configuration panel, you will be given the chance to add a name and description to this version. After you have done so, hit “Publish”.
a. Note: Adding a name and description is optional but recommended. You should enter information here that will make it easy to know what changes are being made.
8. That’s it! You can now verify the summary of the changes you’ve just made.
● Checking if your conversion tag is firing correctly.
1. Open your website using Google Chrome.
2. Perform the required action to trigger your conversion.
a. e.g.: Open your “Thank You” page, Submit your form, Click your ‘Add to Cart button,’ etc.
b. Note: To test button clicks, it is better If in your keyboard you hold down the “Ctrl” (or “Cmd ⌘” key If you’re using a Mac) before clicking on the button that you want to track. This will make sure you will remain on the same page and therefore able to see if the event was indeed triggered.
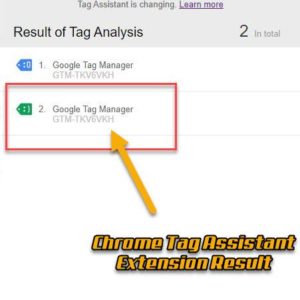
3. Click on the Google Tag Assistant Chrome extension icon. You should now see a green “Google Ads Conversion Tracking” tag >> Click that tag.
4. Now go to tagassistant.google.com to test if you are getting the correct data. It will prompt you to:

5. This will prompt you to the ‘Preview Mode’. While on ‘Preview Mode,’ perform the conversion tracking actions we have configured above.
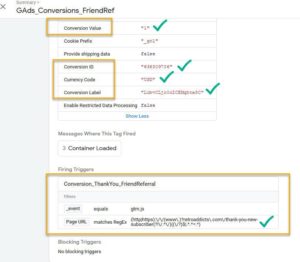
6. In the list of tags fired, look for the one corresponding to the conversion you’ve set up (in our example, ‘GAds_Conversions_FriendRef‘)
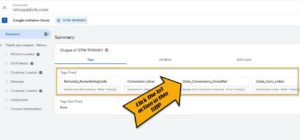
7. Clicking on the tab, you will see that all settings we configured are the correct Conversion Value, Conversion ID, Conversion Label, Currency Code, even the trigger:
8. Make sure your conversion is not firing when you don’t want it to by performing an unrelated non-conversion action and checking if the tag has been triggered.
Note: If your conversion is a “Thank You” pageview, head over to another unrelated page, if your conversion is a button click, try clicking some other similar buttons on the page:
![]()
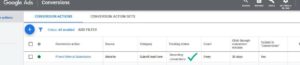
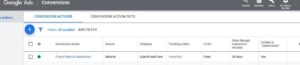
9. Lastly you will want to check if the data is being correctly sent over to Google Ads. To do so, open your Google Ads Conversions panel by clicking here. And check the “Status” of the conversion you have just set up. Ideally you should be seeing:
a. No Recent Conversions;
b. Recording Conversions;
i. Note: Sometimes it may take up to 48 hours to see the status change from “Unverified” to one of those two.
ii. Note 2: If you want to be absolutely sure that your tag is firing correctly, you may want to click your own ad and perform the conversion yourself like a regular visitor would. Bear in mind you will be charged for that click.
10. That’s it! If you’ve performed all these tests your Google Ads conversion should be working great, and you should start seeing new conversions as soon as you start your campaigns!