
Last Updated / Reviewed: June 13th, 2021
Execution Time: 10-20 minutes
Goal: To add the Google Ads Tag to your website
Ideal Outcome: Your tag is properly installed, and your remarketing audience is now being built inside your Google Ads Account.
Prerequisites or requirements: You need a Google Ads Account (using the new Google Ads interface) to be able to perform this SOP. If you don’t have a Google Ads Account set up yet, you can see how to do that here. You should also be using Google Tag Manager to add tags to your site, you can see how to do that here.
Why this is important: Remarketing gives you the chance to reach out to visitors that showed interest in your product or service, by going to your website but might have left without having performed all the actions you would want them to do.
Where this is done: In your Google Ads account (using the latest interface).
When this is done: Only once, when you want to add the remarketing tag for the first time.
Who does this: The person responsible for website management or paid advertising.________________________________________
● Get your Google Ads Global Site Tag Code
1. Log into your Google Ads account by going to https://ads.google.com
2. Go to your Audience Manager either by following this link, or by clicking on wrench icon labeled ‘Tools’ at the top, followed by “Audience Manager”:
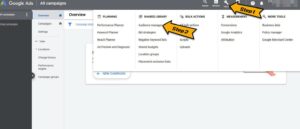
3. On the left sidebar, click on ‘Audience Sources’ and then click on ‘Details’:
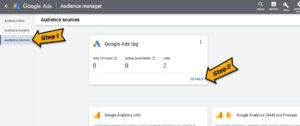
4. Scroll down to the bottom and you will see ‘Tag setup,’ click that to reveal three choices:
a. Install the tag yourself
b. Email the tag
c. Use Google Tag Manager
5. For this SOP, we will select the third option to ‘Use Google Tag Manager.’
a. Click the toggle to reveal ‘Detailed instructions’ on how to create a Google Tag Manager account. [Link to GTM SOP]
b. You will also see: your Conversion ID, copy the ID as you will need it later:

● Set up your Remarketing code using Google Tag Manager.
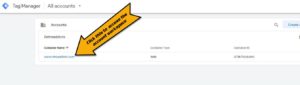
1. Go to https://tagmanager.google.com and select your account:
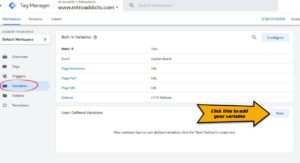
2. We are now going to create a variable to store the Google Ads Conversion ID. Inside the account workspace, click ‘Variables’ in the left sidebar.
3. Inside the ‘Variables’ panel, on the extreme right side of ‘User-Defined Variables’ click “New”:
Note: Using ‘variables’ to store IDs ensures that, in the future, you will be able to easily add new tags that use that ID. In addition to that, if you need to change the ID in all tags (e.g: you change your ad agency), you only need to update it once by updating the variable value.
4. A new panel will slide from the right after you click ‘New’ from the previous step. Click on the Lego brick icon above ‘Choose a variable type to begin set-up.’ A list will slide from the right, scroll down and select “Constant” from the list:

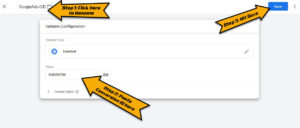
5. Saving your Conversion ID in the variable:
1. Rename the variable by clicking on the text on top.
2. You will want to give it a name that easily identifies what this variable is – (e.g., GoogleAds-CID)
3. Paste the Conversion ID provided by Google Ads in the earlier steps of this SOP and hit ‘Save’:
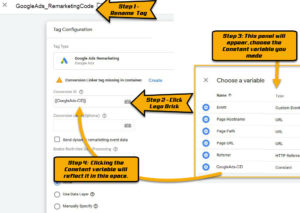
6. Back on the account workspace panel, choose ‘Tags’, then click ‘New.’ The tag panel will slide to the left. Click the tag icon above ‘Choose a tag type to begin set-up,’ scroll down and choose ‘Google Ads Remarketing’:
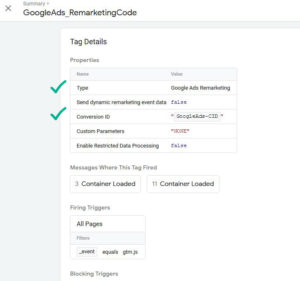
7. Rename your tag, and in the ‘Conversion ID’ field, you will want to select the variable you have just created in the previous step:
Note: When creating new tags, it is recommended to define a naming convention from the beginning, this keeps your Google Tag Manager set up neatly organized and easy to maintain for many years to come.
[Abbreviated Name Of Tool]_[Use for this tag] is a good start.
i. e.g: “GoogleAds_RemarketingCode”
8. All we are missing now is setting up the rule so that it triggers on all pages. To do that, click on interlocking circle icon above ‘Choose a trigger to make this tag fire…’ then select ‘All pages’ and lastly, hit the ‘Save’ button at the topmost right portion:
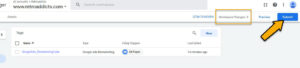
9. You should now be able to see in the top right corner at least 2 workspace changes. If so, you’re now ready to press “Submit”:
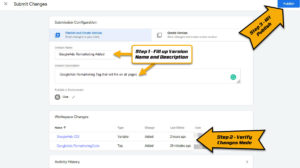
10. In the Submission Configuration panel, you will be given the chance to add a name and description to this version. After you have done so, hit “Publish”.
Note: Adding a name and description is optional but recommended. You should enter the information here that will make it easy to know what changes are being made.
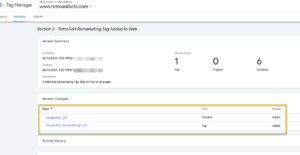
That’s it! You should be able to see the summary of the changes that were just made:
Note: Make sure your privacy policy is updated, and your users are consenting to this new data collection and usage according to the legislations in place.
● Verify set up using Preview Mode and enable the debug signal:
1. In the Google Tag Manager panel, click on ‘Preview’ in the topmost right portion, beside ‘Submit’:

2. After clicking preview, the Google Tag Assistant beta panel will appear:
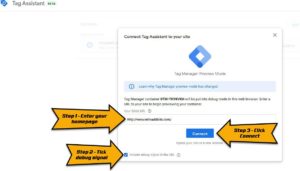
3. After being connected, your homepage opens at a new tab with the ‘Connected’ status at the bottom:

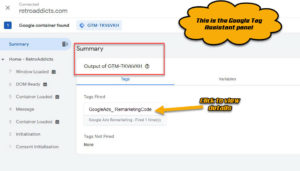
4. The Google Tag Assistant panel will also show a summary of tags fired:
● Verify set up using Tag Assistant Legacy Chrome Extension
Note: This step requires the Google Tag Assistant Legacy extension to be installed on your Chrome browser.
1. Go to your website’s homepage.
2. On your browser, click on the Tag Assistant Legacy icon. An extension panel will pop down, then click on ‘Enable.’
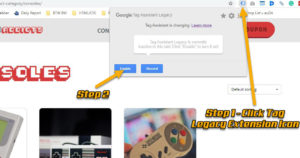
Click on any link in your site and the Tag Assistant Legacy extension will have a ‘red dot’ on its icon when your remarketing tag is detected.
3. Click on the Tag Assistant Legacy icon again, then you will see a green tag with your Account ID in it.
Note: If you are using an AdBlocker you may not see a red tag indicating there is something wrong. Disable your AdBlocker, refresh the page and try again.