
Last Updated / Reviewed: Aug 9th, 2021
Execution Time: ~5-10 minutes
Goal: To add the LinkedIn pixel on your site.
Ideal Outcome: The LinkedIn pixel is properly installed without any technical issues.
Prerequisites or requirements: You’ll need access to an active LinkedIn Ad account. Also, you’ll need access to Google Tag Manager (GTM) that was set up on your website.
If you don’t have a LinkedIn Ad account, sign up here.
If you haven’t set up Google Tag Manager, refer to the following SOPs:
– Set up Google Tag Manager on WordPress
– Set up Google Tag Manager on Shopify
– Set up Google Tag Manager on Squarespace
Why this is important: The LinkedIn Pixel is essential if you want to use LinkedIn advertising features such as retargeting, conversion tracking, and identifying demographics for your website.
Where this is done: In Google Tag Manager and LinkedIn Campaign Manager.
When this is done: Before you run any LinkedIn advertising campaign on your website. You only need to do this once unless you’re running LinkedIn ads on multiple websites.
Who does this: The person responsible for website management, analytics, or paid advertising.
● Environment Setup
Before you start: Open a new browser window with your LinkedIn and Google Tag Manager account signed in.
● Retrieving your LinkedIn Partner ID
Note: The LinkedIn partner ID is synonymous with LinkedIn’s pixel and insight tag. It’s used in GTM to identify and connect your website to your LinkedIn account.
1. Sign in to LinkedIn Campaign Manager with your login details.
2. Select your account.
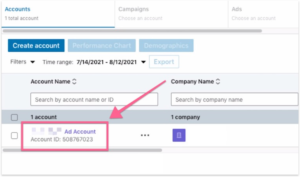
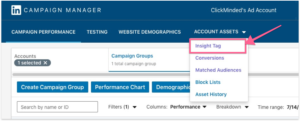
3. Select the “Account Assets” dropdown and select Insight Tag.

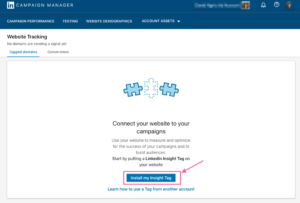
4. In the next screen, click “Install my Insight Tag”.
5. Copy the LinkedIn Partner ID under “I will use a Tag Manager”.
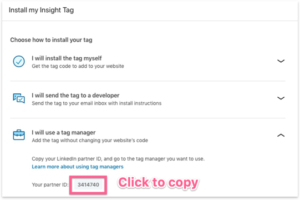
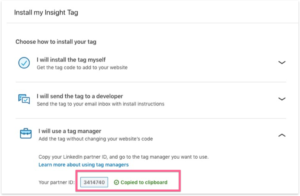
6. Make sure the LinkedIn partner ID (aka the Insight Tag ID) is copied successfully.
● Add LinkedIn Pixel to Google Tag Manager
1. Sign in to Google Tag Manager (GTM). This should be the same GTM account used to set up your website. You should see your website listed under Container Name.
2. Click the container where you want to add the LinkedIn pixel.

3. Create a new tag. A tag is a piece of information/code that you add to your website. In this case, we’re adding the LinkedIn Pixel.
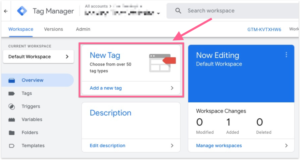
4. Rename your tag and choose a tag type
a. Name this tag to identify it’s LinkedIn Pixel you’re installing.
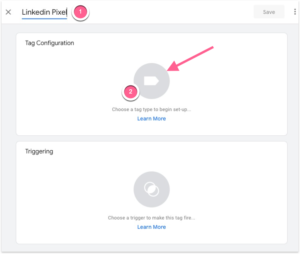
b. Click on the tag icon to select a tag type.
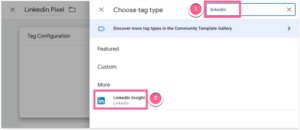
5. Search for LinkedIn in the top right and select the LinkedIn Insight Tag.
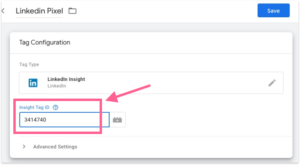
6. Once you’ve selected the LinkedIn Insight Tag, paste the LinkedIn Partner ID (which you copied from LinkedIn previously) into the Insight Tag ID field.
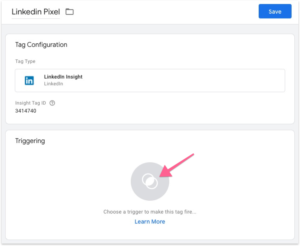
7. Once you’ve set up the tag configuration. Click on the Trigger icon to select a trigger. Here you’ll define where and how the LinkedIn Pixel will fire.
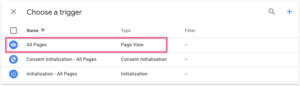
8. Select All Pages. This tells GTM to fire the LinkedIn Pixel on all pages. Alternatively, you can create a custom trigger with the “+” on the right top.
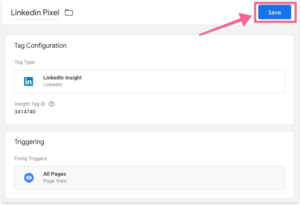
9. Save this new tag that you’ve just created.
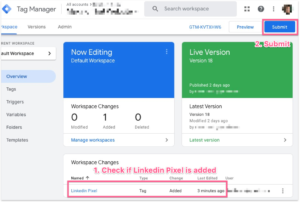
10. You’ll be taken back to the GTM dashboard. Check if the LinkedIn Pixel is added and hit the submit button.
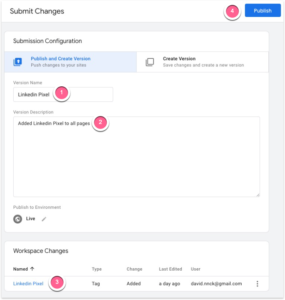
11. Before you publish:
a. Name this change you’re about to make.
b. Write a description for this change.
c. Double check that the LinkedIn Pixel is in the “Workspace Changes”.
d. Hit “Publish” once everything checks out.
12. You have now set up the LinkedIn Pixel on your website.
● Verifying the LinkedIn Pixel is installed correctly
1. Head back to LinkedIn Campaign Manager’s dashboard → Account Assets → Insight Tag.
2. You should see your website listed under tagged domains if you’ve installed the LinkedIn Pixel correctly.
Note: GTM takes a few minutes to deploy the LinkedIn Pixel to your website and
it may take up to 24 hours for the pixel to send a signal back to LinkedIn.
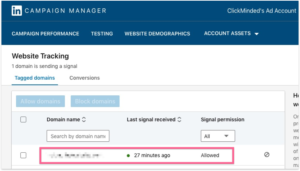
3. Once you’ve confirmed the correct website URL is sending a signal to LinkedIn, you’ve successfully installed the LinkedIn Pixel!