Last Updated / Reviewed: February 1st, 2021 Execution Time: ~15-30 minutes Goal: To add Google Analytics to a site using Google Tag Manager and verify that it is working properly. Ideal Outcome: Google Analytics is properly added without any technical issues. Pre-requisites or requirements: You can only do this once you have installed Google Tag Manager on your site. If you haven’t added Google Tag Manager to your site, you can check out our Google Tag Manager Installation SOPs for WordPress, Shopify, or Squarespace. Why this is important: Google Analytics is the most popular tool to measure website data to gather visitor insights. With it, you will be able to know the amount of traffic you are getting, and how your visitors are behaving inside your website. Where this is done: In Google Tag Manager and Google Analytics. When this is done: Only once—the first time you install Google Analytics. Who does this: The person responsible for website management, or analytics.
⃞ SOP Update: Google Analytics 4 #
💡 Note: Google has released a new version of Google Analytics in October 2020, this new version can be set as a property alongside standard version “Universal Analytics”. The “Universal Analytics” properties will likely be supported by Google for years to come, by setting up a Universal Analytics property alongside a Google Analytics 4 property you can take advantage of the stable and documented features of Universal Analytics while still future-proofing yourself with a Google Analytics 4 property. This is the scope of this SOP. To make sure you can follow this step-by-step SOP make sure you have selected the Universal Analytics property once your Google Analytics account has been created.
- 1. On the top left corner click on the Account Dropdown and select a view within your Universal Analytics property (Not the GA4 property):
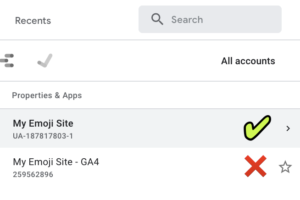
💡 Note: You can identify your Universal Analytics property by noticing the ‘UA-’ prefix in the Property ID below its name: 
⃞ Create and set up a Google Analytics Account #
- 1. Go to https://analytics.google.com/
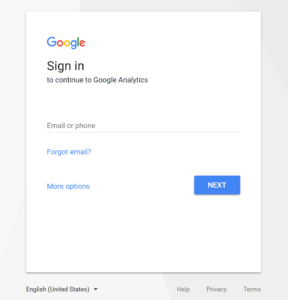
- 2. If you are not logged in to your Google account you will be prompted to log in:
- 3. If you are already logged in to your Google Account but you don’t yet have a Google Analytics account, you will want to create one now by pressing “Sign Up”:Note: Your Google Account can be used for multiple Google services (e.g. Gmail, Adwords, Analytics, etc) but you still have to sign up individually for each service.

- 4. You will now be prompted to fill-in information about your website:
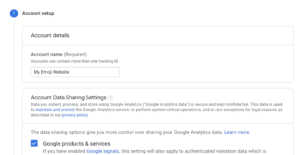
- A. Account Name:
- i. If you want to manage multiple websites under this account you might want to have a name here that applies to all websites.
- ii. If you only have one website you might want to type the name of your website, or your business
- B. Account Data Sharing Settings: Optional data-sharing settings that you can opt-in or out of.
- A. Account Name:
- 5. Click “Next”
- A. Property Name: Write a name that will easily identify the exact website you’ll be tracking. You can even enter the URL of your website If you wish.
- B. Reporting Time Zone: Select the Time Zone that you would like to see being used in your reporting. Usually, this will be the time zone where most of your visitors are located.
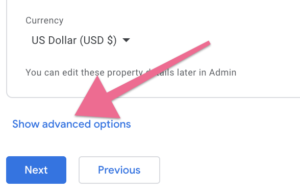
- C. Currency: If your website handles transactions, this is where you should select the currency your website uses.
- 6. Click “Show advanced options” (⚠️ Important Step)
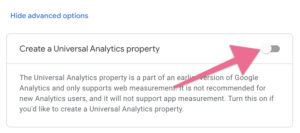
- 7. Click “Create a Universal Analytics property” and enter the following options:
- A. Website URL: Select the right protocol for your website (http:// or https://):
- i. If you don’t know what your website’s protocol is type your website URL in Google Chrome starting with “https://” (e.g. “https://clickminded.com”)
- If you see a green padlock before the URL appearing, it means you should select “https://”
- If instead you see a red padlock and a “Not Secure” message appearing, you will want to select “http://”

- If you see a green padlock before the URL appearing, it means you should select “https://”
- i. If you don’t know what your website’s protocol is type your website URL in Google Chrome starting with “https://” (e.g. “https://clickminded.com”)
- B. Create both a Google Analytics 4 and a Universal Analytics property: Select this option.
- Enable enhanced measurement for Google Analytics property: Yes
- C. Industry Category / Business Size / How do you intend to use Google Analytics: Select the ones that apply. Don’t worry, this will not have a direct impact on your tracking and is an optional field. It is used by Google to help them improve Google Analytics and compile industry averages.
- A. Website URL: Select the right protocol for your website (http:// or https://):
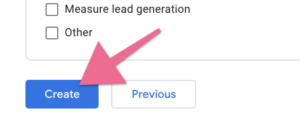
- 8. Scroll down to the bottom and click on: “Create”:
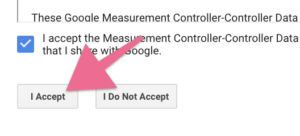
- 9. Read and accept the Terms & Conditions:
- 10. You will be sent to the Google Analytics account you’ve just created. On the top left corner select your Universal Analytics property (Not the GA4 property):

 💡 Note: In addition to the “GA4” at the end of the Property name (indicating the Google Analytics 4 property), you can also identify your Universal Analytics property by noticing the ‘UA-’ prefix in the Property ID below it’s name:
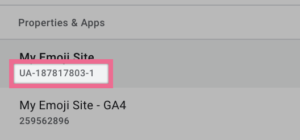
- 11. Take note of your Google Universal Analytics tracking ID, you will need it for the next steps. This ID will be a code that starts with “UA-”.
⃞ Set up Google Analytics using Google Tag Manager #
Note: If you don’t have Google Tag Manager set up on your website, you will want to follow the procedure covered in SOP 004 – Add Google Tag Manager to a WordPress Site
- 1. Go to http://tagmanager.google.com and sign in with your account details.
- 2. Select the container that is set up on your website.

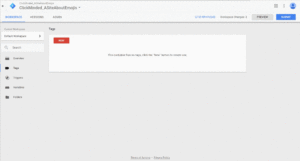
- 3. Go to “Tags”:

- 4. Click on “New” and rename your tag. It is recommended that it contains a mention to Google Analytics, it makes it easier in the future to locate the tags you are looking for.Note: When creating new tags it’s recommended to define a naming convention from the beginning, this keeps your Google Tag Manager set up neatly organized and easy to maintain for many years to come.[Abbreviated Name Of Tool]_[Use for this tag] is a good start.
- e.g: “GA_TrackingCode”
- e.g: “GA_TrackingCode”
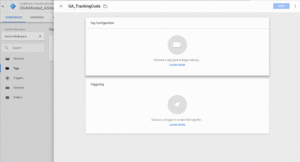
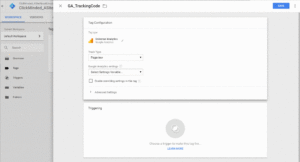
- 5. Click on the “Tag Configuration” section → Select “Universal Analytics”:
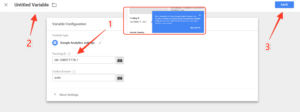
- 6. You’re now going to create a “Variable” where we are going to store the Google Analytics Tracking ID. Click on the “Google Analytics Settings” selection box, and select “New Variable…”
- A. First, copy the Google Analytics Tracking ID (that you took note of in the beginning of this SOP)
- B. Next, rename the variable by clicking on the text on top. (you will want to give it a name that easily identifies what this variable is – e.g. “GA Tracking ID”)
- C. Finally, hit “Save”
- D. You will be taken back to the previous menu.
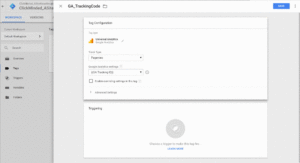
- 7. Now you will want to set up a “Trigger” for this “Tag”. To do that, click on the “Triggering” section, and once the new menu opens click “All pages”:
- 8. You are now ready to save your settings by clicking on “Save”:

- 9. If you now click on “Overview” on the sidebar, this is how your Google Tag Manager overview dashboard should look like:
- 10 If everything looks ok, you are now ready to hit “Submit”
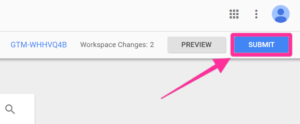
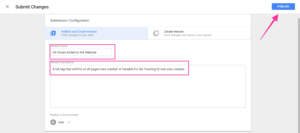
- 11. In the Submission Configuration panel, you will be given the chance to add a name and description to this version. After you have done so, hit “Publish”.Note: Adding a name and description is optional but recommended. You should enter the information here that will make it easy to know what changes are being made.
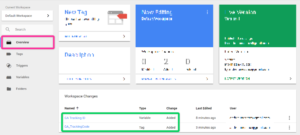
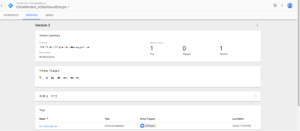
- 12. You will now be taken to see the summary of the changes you’ve just made:
⃞ Verify your set up with Google Tag Assistant #
Note: This step requires Google Chrome’s Google Tag Assistant extension to be installed on your browser.
- 1. Go to your website’s homepage
- 2. On your browser click on the Tag Assistant Icon

- 3. You should be able to see a Tag named “Google Analytics” and your Analytics Tracking ID beneath it (UA-XXXXXXXXX-X)
- 4. Repeat this procedure for a few more pages of your website. You should always be able to see the “Google Analytics” tag inside Google Tag Assistant.
⃞ Verify your setup inside Google Analytics #
- 1. Open Google Analytics by heading over to https://analytics.google.com
- 2. You will be taken to your account Home.
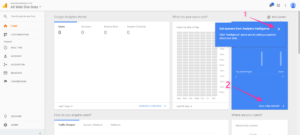
- 3. Close the popup and click on “Real-time Report”
- 4. In another Google Chrome tab or window open up your website URL.
- 5. Now go back to the Google Analytics’ tab and wait a few seconds.
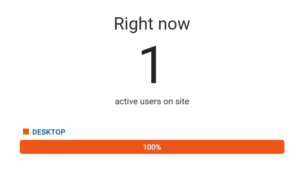
- 6. You should see (at least) 1 active user on the website:
⃞ Adding your first views #
Note: If you have just created your Google Analytics account you will notice you now have one view named “All Web Site Data”. This is alright If you are sure you will not be doing any customizations on your Google Analytics properties. However, we recommend that you create 3 additional views:
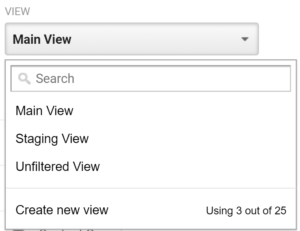
- Main View: This is your go-to view. This is where you will be doing all your analysis and should be working flawlessly. All customizations to Google Analytics should have already been properly tested in the Staging View as not to affect this view’s data.
- Staging View: This is your Google Analytics sandbox. If you want to test something new but are unsure how it will affect your data (e.g: creating a new filter) you will want to do it here and give it a few days before migrating the changes to the Master View.
- Unfiltered View: This view will be left untouched no matter what. No customizations whatsoever will be done to this view.
With this structure, you will always have a way to recover lost data in case something goes wrong. The unfiltered view will always have all your data. And the “Main View” will have all your filters properly applied.
- 1. Go to your Google Analytics Admin page by clicking here.
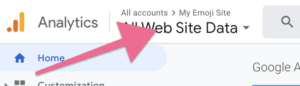
- 2. If you have multiple Analytics accounts make sure the right account and property is selected:


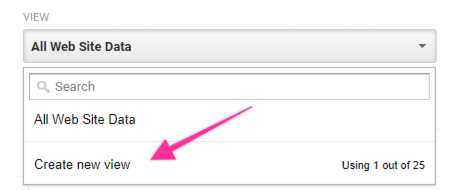
- 3. Under “View” click on the dropdown box and select “Create a new view”:
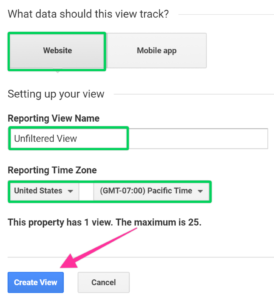
- 4. Insert the view details:Note: Make sure you select the same “Reporting Time Zone” you have selected for the other views.
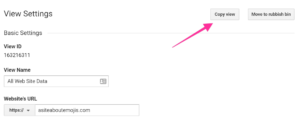
- 5. We’re now going to create the Staging View. To do that, select the “All Web Site Data” from the dropdown. And click on “View Settings”:

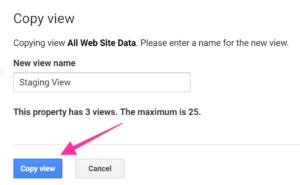
- 6. Click “Copy View”
- 7. In the “New view name” field type “Staging View”, and click “Copy View”:
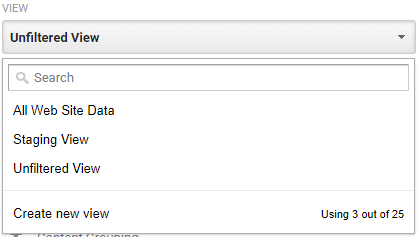
- 8. You should now have these 3 views:
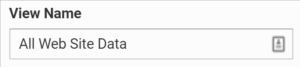
- 9. All we need now is to rename the original view and we’ll be done. To do it, select the “All Web Site Data” view.
- 10. Click on “View Settings”:

- 11. Click on “View Settings” and rename the view name that will now be your “Main View” and hit “Save”:
- 12. You should now be able to see your first three views: