
Last Updated / Reviewed: March 6th, 2021
Execution Time: 15-30 minutes
Goal: To have all your conversions set up and sending the conversions data to the Facebook ad platform.
Ideal Outcome: The conversions are properly set up and you are now able to use them inside your Ad campaigns.
Prerequisites or requirements: To follow this SOP to add Standard Events you need to have installed Google Tag Manager on your site. If you haven’t done so already and you are using WordPress you can follow SOP 004. You also need to have the Facebook pixel on your website, If you don’t have it yet, you can follow: SOP 005.
Why this is important: When you finish this SOP you should then be able to see how many conversions and how much revenue each ad is bringing you, allowing you to start optimizing your campaigns for the best results.
Where this is done: In your Google Tag Manager account and Facebook Ads platform.
When this is done: Every time there is a new conversion that needs to be measured.
Who does this: The person responsible for IT, analytics, or paid advertising.
● Environment Setup
Important:
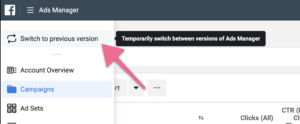
● If you are using the new Ads Manager UI, switch first to the previous version:
● Deciding which conversion tracking method is better for you
Note: If you are already familiar with Facebook Conversion tracking and have a preference of one method over the other you can skip this chapter and go straight to the tracking method you prefer. In some cases choosing one over the other can be a matter of personal preference. For the purpose of this SOP a decision diagram was created to simplify the decision process.
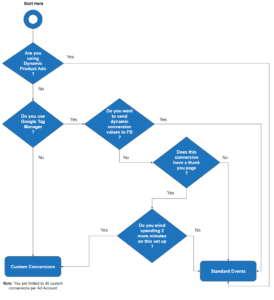
This SOP will cover both methods, you can jump to the one you prefer by clicking here:
■ Tracking conversions using Facebook’s Custom Conversions
■ Tracking conversions using Facebook’s Standard Events
● Setting up conversion tracking for a lead signup using Facebook’s Standard Events with Google Tag Manager
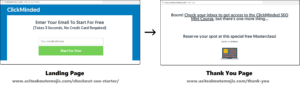
Note: This SOP will cover the process to track any conversion that ends in a redirection to a “Thank You” page. In most cases you will have a page where the user needs to perform an action (e.g: insert contact details, or purchase a product) and after the user performs that action they will be sent to a final page. This is the page where you will be setting up your conversion event.
E.g:
1. Open Facebook’s Business Manager on your browser by going to: https://business.facebook.com.
2. On the header, click on Pixels:

3. Select your website’s pixel:

4. Click “Set up”:
![]()
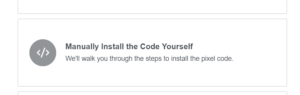
5. Select “Manually Install the Code Yourself:
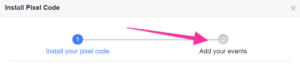
6. Select “Add your events”:
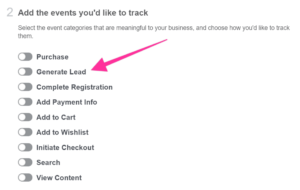
7. You will find a list of the events Facebook already offers by default and are available to you now:
a. Note: For the purpose of this SOP we will be tracking a lead signup. If you are tracking any other event you should select the one that relates the most to what you would like to track.
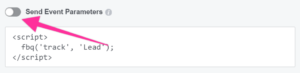
8. Under “Copy generate lead event code” toggle “Send Event Parameters”:
9. At this point Facebook is giving a chance to input a conversion value. If you know, or are able to estimate how much this lead is worth to you, you can insert that value in the “Conversion Value” field. In the currency field you should input the 3-letter ISO currency code you want to use for this conversion. If you don’t know, or if you don’t want to input your conversion value you can leave both fields blank.
a. Note: You can find a list of 3-letter currency codes here.
10. The script will update dynamically as you type your conversion value and currency. After you’re done, click “Copy Code to Clipboard”:
11. You will now need to insert that script on your “Thank you page” which is the page the user is redirected to after submitting the contact information. To insert this script in the “Thank you page” you are going to be using Google Tag Manager.
a. Note: If you don’t have Google Tag Manager set up on your website, you will want to follow the procedure covered in SOP 004 – Add Google Tag Manager to a WordPress Site
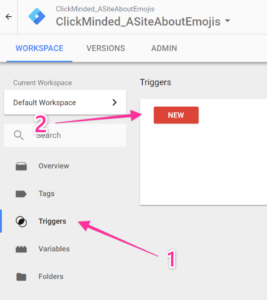
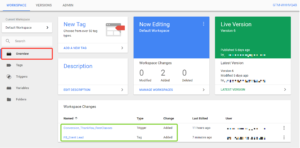
12. Go to tagmanager.google.com and select the account you want to work on:
![]()
13. Click “Triggers” and then “New”:
14. Rename your Trigger → Click “Choose a trigger to begin set-up…” → Select “Page View” → Select “Some Page Views”:
a. Note: When naming your trigger It is recommended that you define your naming convention. It should be clear and fast to guess what each trigger is doing based solely on its name. For this SOP we will be using:
“Conversion_ThankYou_FreeClasses” since this trigger is going to be used to track a conversion, using a thank you page, related to the “free SEO class offer”.
15. Under the trigger firing rules, select: “Page URL” → “matches RegEx”.
16. You will now need to build a RegEx (Regular Expression) that matches the URL where we want our Facebook Pixel to fire.
a. Note: If you are comfortable with GTM and your website structure you might not need to use a RegEx condition at this point, or you might want to tweak the RegEx to fit your needs. If not, you can follow this procedure.
b. Note2: In the following steps you’ll be creating a RegEx that will match your url whether:
1. It starts with http, or https;
2. You are using a trailing slash, or not;
3. You are adding parameters to your URL, or not;
4. You have deeper URLs in your folder structure, or not;
ii. Type the url where you want your conversion to fire.
E.g: http://www.asiteaboutemojis.com/thank-you/
iii. Remove the http:// (or https://), the www, and the last trailing slash from the URL:
E.g: asiteaboutemojis.com/thank-you
iv. Add a \ right before every dot and every slash.
E.g: asiteaboutemojis\.com\/thank-you
v. Add this code after your URL: (?!\/.*\/)((\/?)$|.*.*=.*)
E.g:asiteaboutemojis\.com\/thank-you(?!\/.*\/)((\/?)$|.*.*=.*)
vi. Add this code in the beginning of your URL: (http|https):\/\/(www\.)?
E.g: (http|https):\/\/(www\.)?asiteaboutemojis\.com\/thank-you(?!\/.*\/)((\/?)$|.*.*=.*)
vii. That’s it. You just built your RegEx. Take note of that expression.
17. Insert your RegEx in the last field. It should look something like this:
![]()
18. Click the blue “Save” button on the top right corner, and that’s it. You’ve just created your trigger. We now need to create the “Tag” that will contain the Facebook Conversion Script.
19. In the sidebar click on “Tags”, and then “New”:

20. Rename your tag:
a. Note: When creating new tags it’s recommended to define a naming convention from the beginning, this keeps your Google Tag Manager set up neatly organized and easy to maintain for many years to come.
[Abbreviated Name Of Tool]_[Use for this tag] is a good start.
i. e.g: “FB_Event Lead”
![]()
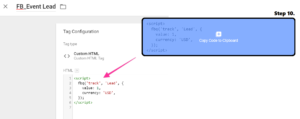
21. Under “Tag Configuration” click “Choose a tag type to begin set-up”. From the dropdown list select “Custom HTML”.
22. On the HTML field paste the Facebook event code you copied in step 10 of this SOP:
23. In the “Triggering” section, click “Choose a trigger to make this tag fire…”, and then select the trigger you’ve just created (Step 18), and click “Save”
24. If you now click on “Overview” on the sidebar, this is how your Google Tag Manager overview dashboard should look like:
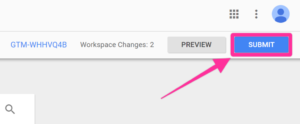
25. If everything looks ok, you are now ready to hit “Submit”
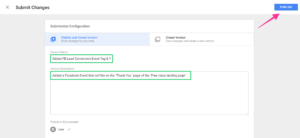
26. In the Submission Configuration panel you will be given the chance to add a name and description to this version. After you have done so, hit “Publish”.
a. Note: Adding a name and description is optional but recommended. You should enter information here that will make it easy to know what changes are being made.
27. That’s it! You will now be taken to see the summary of the changes you’ve just made:
![]()
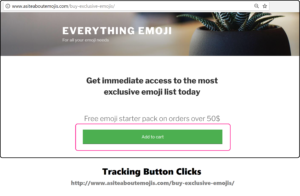
● Setting up conversion tracking for a Button Click using Google Tag Manager
Note: This SOP will cover the process to track any button click conversion. This is especially useful when tracking “Add to Cart” events. This allows you to later create custom audiences based on this interaction with the store.
E.g:
1. Open Facebook’s Business Manager on your browser by going to: https://business.facebook.com.
2. On the header, click on Pixels:
3. Select your website’s pixel:
![]()
4. Click “Set up”:
![]()
5. Select “Manually Install the Code Yourself:

6. Select “Add your events”:

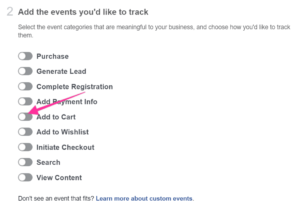
7. You will find a list of the events Facebook already offers by default and are available to you now:
a. Note: For the purpose of this SOP we will be tracking a “Add to Cart”. If you are tracking any other event you should select the one that relates the most to what you would like to track.
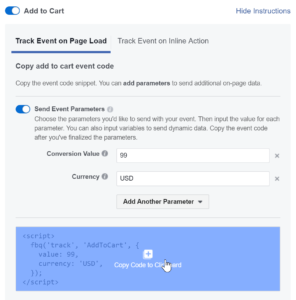
8. Under “Copy add to cart event code”, toggle “Send Event Parameters”.
9. At this point Facebook is giving a chance to input a conversion value. If you know, or are able to estimate how much this “Add to Cart” is worth, you can insert that value in the “Conversion Value” field. In the currency field you should input the 3-letter ISO currency code you want to use for this conversion. If you don’t know, or if you don’t want to input your conversion value you can leave both fields blank.
a. Note: You can find a list of 3-letter currency codes here.
10. The script will update dynamically as you type your conversion value and currency. After you’re done, click “Copy Code to Clipboard”:
11. You will now need to fire that script when the user clicks the “Add to Cart” button. To do that you are going to be using Google Tag Manager.
a. Note: If you don’t have Google Tag Manager set up on your website, you will want to follow the procedure covered in SOP 004 – Add Google Tag Manager to a WordPress Site
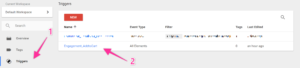
12. Go to tagmanager.google.com and select the account you want to work on:
![]()
13. Click “Variables” → “Configure”.
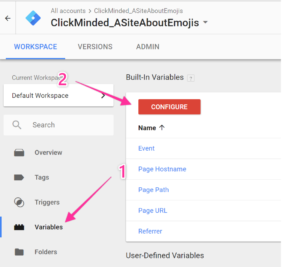
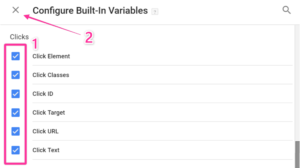
14. A list of variables will be available to you. Select all the variables under “Clicks” and when that is done close the list.
a. Note: If you already know which variables you are going to need. You can simply select the specific variable you are going to be using for this event.
15. Click “Triggers” → “New”:
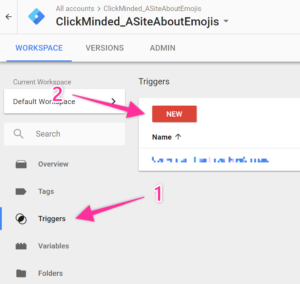
16. Rename your Trigger → Click “Choose a trigger to begin set-up…” → Select “Click: All Elements” → Select “All Clicks” → “Save”:
a. Note: When naming your trigger, it is recommended that you define your naming convention. It should be clear and fast to guess what each trigger is doing based solely on its name. For this SOP we will be using:
“Engagement_AddtoCart” since this trigger is going to be used to track an AddtoCart click and we only have one button on this store.
17. You now need to find out which of the variables to use for the purpose of what you want to track. To do that click “Preview” on the top right of the page:
![]()
18. Enter the URL of your website → Click “Start”
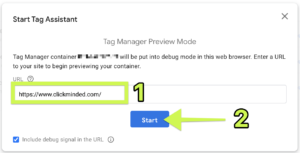
19. This will open your website’s URL on a new tab. Navigate to the page where the button you want to track is. You should be able to see a message on the bottom right corner letting you know that the debugger has connected successfully:

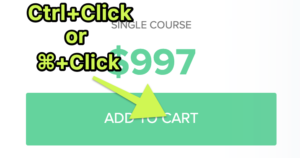
20. On your keyboard hold down the “Ctrl” (or “Cmd ⌘” key If you’re using a Mac) and click on the button that you want to track. A new “Link Click” (or gtm.click) option should appear on the Google Tag Manager list to the left → Click that option → Click “Variables
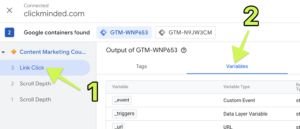
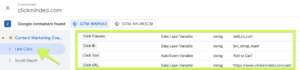
21. In this list, Google Tag Manager lists all the information that was returned from that click.
a. If your “Click ID” field has been filled with a text string (e.g: ‘atc_emoji_main’) take note of the combination. (e.g: Click ID | atc_emoji_main)
i. Note: Usually HTML ID’s are unique within the page, in rare cases your web designer might have used the same ID for different elements. If that is the case you will want to select option b. or c.
b. If you don’t have a “Click ID” and you are sure your HTML Class is not shared with any other button that you don’t want to track, you can use that. Take note of that combination (e.g: Click Classes | add-to-cart). If you are unsure, go with the next option (c.).
c. If none of those two options apply to you, you should use the “Click Text” variable. Take note of that combination (e.g: Click Text | Add to cart)
i. Note: Make sure this specific text is not being used elsewhere in another link. Otherwise clicks on that link will count as conversions as well.
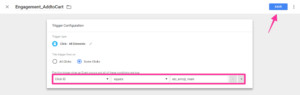
22. Click “Triggers” and then select the trigger you just created in step 16 of this SOP:
23. Click “Trigger Configuration”→ Under “This trigger fires on” select “Some Clicks” → Select the combination you took note in step 20 of this SOP → Hit “Save”.
(e.g: [Click ID][equals][atc_emoji_main])
23. In the sidebar click on “Tags”, and then “New”:
24. Rename your tag:
a. Note: When creating new tags it’s recommended to define a naming convention from the beginning, this keeps your Google Tag Manager set up neatly organized and easy to maintain for many years to come.
[Abbreviated Name Of Tool]_[Use for this tag] is a good start.
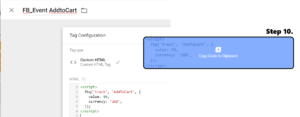
i. e.g: “FB_Event AddtoCart”
![]()
25. Under “Tag Configuration” click “Choose a tag type to begin set-up”. From the dropdown list select “Custom HTML”.
26. On the HTML field paste the Facebook event code you copied in step 10 of this SOP:
27. In the “Triggering” section, click “Choose a trigger to make this tag fire…”, and then select the trigger you’ve just created (Step 22), and click “Save”
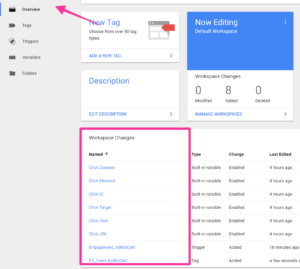
28. If you now click on “Overview” on the sidebar, this is how your Google Tag Manager overview dashboard should look like:
29. If everything looks ok, you are now ready to hit “Submit”

30. In the Submission Configuration panel you will be given the chance to add a name and description to this version. After you have done so, hit “Publish”.
a. Note: Adding a name and description is optional but recommended. You should enter information here that will make it easy to know what changes are being made.
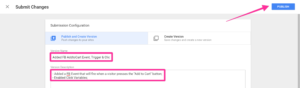
31. That’s it! You will now be taken to see the summary of the changes you’ve just made:
![]()
● Check if conversions are being tracked properly
Note: This step requires the Facebook Pixel Helper Chrome Extension to be installed on Google Chrome.
1. Open your website using Chrome.
2. Perform the action that you want to check if it is being tracked. (e.g: submitting a form, adding a product to cart, etc)
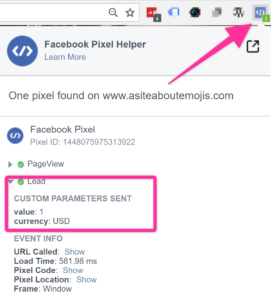
3. Click on the Facebook Pixel Helper Chrome extension.
4. You should be able to see the name of the conversion that you are tracking appear on the list, clicking on it will show the conversion parameters. Those will only be set if they were configured when setting up the event.
a. Note: If you’re tracking a button click you might need to press and hold the Ctrl key (or Cmd ⌘ If you use a Mac) when you click on it. This will make sure the link is opened in a new tab and therefore the page will not refresh making you potentially miss the opportunity to see the event being tracked.
b. Example for a Lead Submission:
i. Go to your “Thank You Page” (e.g: http://www.asiteaboutemojis.com/thank-you)
ii. Click the Facebook Pixel Helper Extension, you should see the event you chose to fire when that button is clicked.
5. Once you’ve verified that your conversion is being tracked successfully, you’ll need to configure it in Business Manager.
a. Example for a Button Click:
i. Go to the page where the button is.
ii. Press and hold the Ctrl key (or Cmd ⌘ If you use a Mac), and click the button you want to test.
iii. Click the Facebook Pixel Helper Extension, you should see the event you chose to fire when that button is clicked.
● Using Facebook Custom Conversions to track a Lead Signup
1. Log in to Facebook.
2. Go to your Facebook Ads Manager.
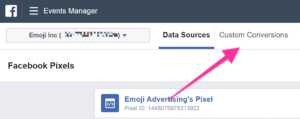
3. In the top navigation menu, click on “Pixels.”
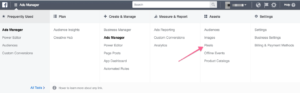
4. In the top menu, click on the “Custom Conversions.” tab
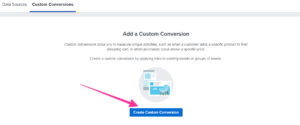
5. Click “Create Custom Conversion”
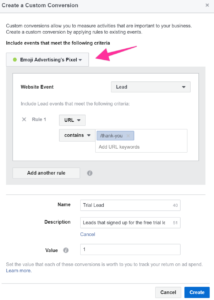
6. You should be able to set up all the information regarding what you want to track now. Make sure you have selected the right pixel to work on. The options to be configured here will depend on what you want to track:
a. Website Event: Select the one that better fits your purpose. If It is not a Lead, or an Add to Cart, pick “All URL Traffic”. For this SOP, to track Lead Signups you’ll select “Lead”.
b. Rule 1: Select [URL][contains] and type here a specific part of your URL that will not be in any other of your page URLs.
i. E.g.: If your URL is: asiteaboutemojis.com , and your “Thank you” page is: asiteaboutemojis.com/thank-you, you can use:
1. asiteaboutemojis.com/thank-you, or
2. /thank-you
ii. But, if you have other URLs on your site that may contain that same text, do not use that, example:
1. Thank you page: asiteaboutemojis.com/thank-you
2. Another unrelated page for a different conversion: asiteaboutemojis.com/thank-you/unrelated_offer
If you used [URL][contains][thank-you] for your rule, the second page will also count as a conversion since it also contains “/thank-you”.
If this is the case consider:
1. Using another part of the URL to create the rule.
2. Editing the URL slug of your thank you page so that it is absolutely unique
e.g.: asiteaboutemojis.com/thank-you-199282jsn | in this case you can use: [URL][contains][199282jsn]
3. Using [URL][equals] instead of [URL][contains].
a. Note: If your website or any of your tools use dynamic parameters in the URL your conversions will not be tracked.
4. Not using Facebook Custom Conversions and using Standard Events through Google Tag Manager instead, as described in the first chapter of this SOP.
c. Name: Try not to make this too long, it should be evident what this conversion is about. (e.g: Trial Lead)
d. Description (optional): Add some more information about this conversion if it is not clear enough in the name.
i. Remember: You will want anyone to understand what the conversions are about. You might want to assign the ad account management to an employee or an agency. They should not be guessing what each conversion is.
e. Value (optional): How much is this conversion worth to you. If you choose to input this field you will be able to see it when analyzing campaigns and more efficiently optimize your campaigns.
7. Click “Create” and your custom conversion has been created successfully:
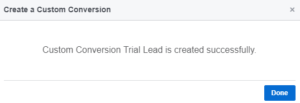
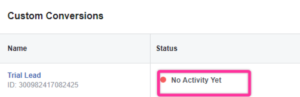
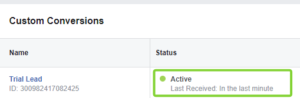
8. Click “Done” and you will see your new custom conversion on the list.
If you’re seeing a green light and an “Active” status it means someone browsing your website has already triggered the rule that you created. If that is the case your custom conversion should be correctly configured.
a. In many cases you might see this message:
b. If that is the case, simply open a new tab on your browser and open your “Thank you” page (or the conversion page you set up before)
![]()
c. Wait 30 seconds. Go back to the Facebook Custom Conversion tab, refresh the page and re-check. You should now be able to see this message:
9. Once you’ve verified that your conversion is being tracked successfully, you’ll need to configure it in Business Manager.
● Configuring your conversion events in Facebook Business Manager
1. After you’ve set up conversion tracking, you’ll need to configure these conversions in Facebook Business Manager before you can use them in your campaigns. Follow this SOP to learn how to do that.